First things first: we think it’s easiest to learn by example. So to introduce you to using Adobe® Flash® Catalyst™CS5, the newest member of the Adobe Creative Suite® family, we’ll quickly, (and we mean very quickly), show you how to create an interactive video gallery without writing any code.
What is Flash Catalyst? It’s the new interaction design tool from Adobe that lets you take your static Illustrator, Photoshop, and Fireworks artwork to expressive projects with interaction, audio, video, and animation.
Let’s start our project in Illustrator CS5. Although Flash Catalyst provides a panel of drawing tools, it’s not meant to trump its co-suite products with their fine-tuned array of advanced drawing tools. As a warning, we’re not super-skilled illustrator users, so no judging our quick illustrator video gallery mockup! In fact, I encourage you to quickly think about how you would like a video gallery to look before reading the rest of this article. And be creative.
Preparing your mockup for use in Flash Catalyst
Here’s a quick screenshot of the mockup we’re going to convert into a video gallery:
We created a simple symbol (the video reel), tweaked the title, and used the built-in Vector Pack Grunge Brushes in Illustrator CS5 to create the painted look for the video frame and the play button.
Tip: Be sure to rasterize any complex brushes before bringing your artwork into Flash Catalyst. Since the artwork will be used on the web ,the artwork can be rasterized at screen resolution (72 dpi). Flash Catalyst interprets artwork into a format called FXG (Flash XML Graphic format), so each one of those paths in a brush stroke is represented as an object in Flash Catalyst, and some of the complex brushes in Illustrator will end up creating an large number of paths. Optimizing your artwork before bringing it into Flash Catalyst will enhance your experience with the product.
Tip: Be a good citizen and name your layers in a logical manner Layer names are preserved on import into Flash Catalyst. The better job you do naming and breaking content into layers, the easier, and quicker, you’ll be able to work.
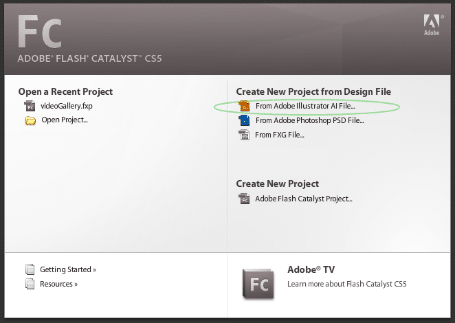
To bring your artwork into Flash Catalyst, from the Welcome Screen, under Create New Project from Design File, select the appropriate link depending upon where your artwork originated.
For this example, we’ll select From Adobe Illustrator AI File… This lets us load our artwork into Flash Catalyst, then dig right into converting each piece to an appropriate video gallery component. Our video gallery will consist of a main player, a thumbnail gallery of optional videos to play, and our custom play button.
Lets go ahead and start by converting our row of gray rectangle — which are really just thumbnail placeholders — into a gallery thumbnail list.
Creating your thumbnail list
To create the thumbnail list:
Using the Select tool, select the group of rectangles in the bottom section of the Illustrator comp.
We’ll then convert this group into a list component that repeats an item as a template, rather than a group of individual rectangles.
From the Flash Catalyst HUD (Heads-Up Display), select Convert Artwork to Component > Choose Component > Data List.
Next, double click on the newly created Data List to enter Edit-In Place mode.
Edit-In-Place lets you edit the data list in isolation, without affecting any of your other artwork or components. When we created the mockup in Illustrator we grouped all the rectangles to keep track of them. We will now ungroup them. Select the group, then from the Flash Catalyst Main Menu, choose Modify > Ungroup.
We now have nine individual rectangles where before we had a single group.
Next we’ll mark one of the rectangles as the “template” to repeat for each item in the list.
From the Main Menu select Edit > Deselect All. Next, select the leftmost rectangle, and from the HUD, choose Convert to Data List Part > Choose Part > Repeated Item (required).
Flash Catalyst converts the selected item into the repeated item part.
However, there are a couple of items to adjust here. The first is that we need a horizontal list of items, rather than the default vertical. list The second is that all the old rectangle placeholders are still in the project. But one thing at a time.
In the Properties panel in the lower right corner of Flash Catalyst workspace, choose Layout. This is where we can control how the Data List lays out its repeating items.
Select Horizontal, and adjust the spacing until your repeating items have the same spacing as the rectangle placeholders. The spacing that worked best for us was 11-12 pixels. Note that the default number of items for a Data List is five, so be aware that you want to line up the Data List to just the first five of the nine rectangles. You’ll also want to adjust the blue bounding box to snugly fit it to the area where your thumbnails will display.
To make this Repeated Item the same in all states of the Data List, from the HUD, select Make Same in All Other States.
Next we’ll clean up those pesky rectangle placeholders. From the Layers panel, highlight them (there should only be eight, since we converted one of them to our template item), and select the Delete icon at the lower right corner of the Layers panel to delete them.
Adding Image Thumbnails
What we’ve created so far is a placeholder for each video thumbnail, and we’d like to show a custom image in each thumbnail to identify each video clip.
First, you’ll need thumbnails for each of the clips. Create eight images to represent your movie clips, and make sure each image is roughly the size of the rectangle. Too much larger and you’ll be consuming valuable bytes, too much smaller and the images will look bad when they scale up to fill the rectangle. For this project, the thumbnail rectangles are 47 pixels high by 36 pixels wide. You can see this by selecting a rectangle and viewing the size in the Properties panel.
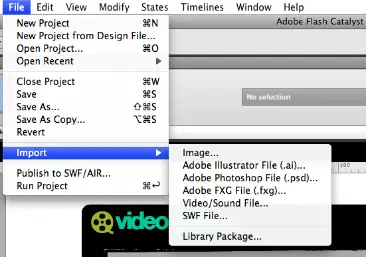
Import the images by choosing File > Import > Image. The imported images will show up in the Library panel, on the right side of the Flash Catalyst workspace.
While in Edit-In-Place mode, double click on the rectangles to edit the List Item template, which Flash Catalyst calls the Repeated Item.
Drag out one of your thumbnail images from the Library panel, and adjust it to cover and fill the rectangle. The easiest way to do this is to manually set the image’s x, y position and the width and height to match the rectangle’s. This information is available in the Properties panel when the rectangle is selected.
Next, select the image, then right click to choose Share to State > All States. This will make the image visible in the Over and Selected states, which display when mouse hovers over or selects an item in the list. You can see this by looking at the Pages/States panel at the top of the workspace.
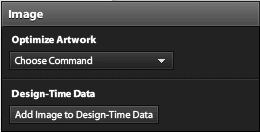
With the image selected, from the HUD, select Add Image to Design-Time Data. This will allow you to manually set the image source for each item in the list using the Design Time Data Panel.
Double click outside the image to go back to editing the list.
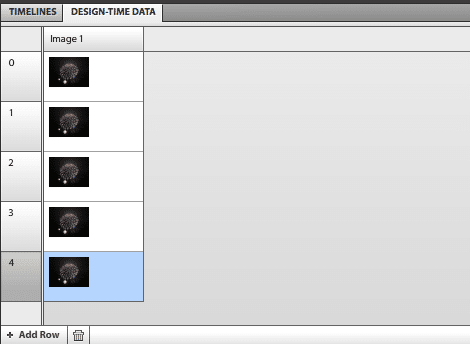
In the Design-Time Data Panel, you should now see a preview of your image for each item in the list. You may need to select the Design-Time Data tab in the bottom of Flash Catalyst to get the panel to pop up. We’re starting out with only five items in our list, but we want nine. Select + Add Row at the bottom of the Design-Time Data panel until you have nine thumbnails. Note that the numbering starts from “0,” so although the highest number shown in the image below is 4, we actually have five items.
Now, to select the thumbnail image for an item in the list, click its thumbnail in the Design-Time Data panel. The Select Asset dialog will display all the image assets in your library. Select the one you want, and click OK.
If you repeat this for each item, you should see nine different image thumbnails in your Data List.
We’ve been editing the list or its template item in Edit-In-Place mode this entire time. You can exit Edit-In-Place mode by pressing Escape or clicking the name of the application in the Breadcrumb bar above the artboard. You can also click in the dimmed area on the artboard or choose Modify > Edit Editing to exit Edit-In-Place mode.
Creating your main video player
Let’s now create our main video player. We’d like the user to be able to select a thumbnail, and then play the selected video clip in a larger video player. Also, we’d like our video player to sit behind the brush-stroke border and the Play button, but in front of the black chrome of our gallery.
To place a video player in Flash Catalyst, you first need to import an actual video file. To import a video file, from the Main Menu choose File > Import > Video/Sound File.
Our main video player now appears on the Flash Catalyst artboard. You’ll notice all imported video files appear with what we call the “chrome,” which is the design of scroll bars, window borders and other user interface elements on screen. This video-player chrome includes a border, a play/pause button, volume control, and a full-screen button.
But for this project, we we don’t want these default video controls to appear. So we’ll need to create our own custom controls, and will use only the video display “part” of the default video player.
To change the appearance of the video player, select the player on the artboard.
From the Properties panel > Video controls:, select None.
The ‘none’ option removes all the default controls, giving us just the video player.
Tip: In case you’re interested in showing the chrome around the video player, here’s the difference between the wireframe and standard options:
“Wireframe” exposes a blue-themed set of controls, resembling a blueprint for mocking up and prototyping applications. If you were doing a quick mockup for a customer in Flash Catalyst, Wireframe is the way to go. “Standard” is the default look and feel used by the video player. It’s a nice, grayscale theme with black icons. You could imagine placing the standard chrome in a final design.
 To achieve the layering effect, so the video player sits under (or behind) the brush stroke and play button artwork but above (or on top of) the black gallery frame, we will use the Flash Catalyst Layers panel.
The Layers panel is located in a grouping of panels in the top-right most section of the Flash Catalyst workspace. At first glance, you’ll find it looks similar to and contains much of the same functionality you’re used to in the Layers panel found in Photoshop or Illustrator.
Lets take a look at the Layers panel.
As you can see, our Video Player is the top most item in the list. This means it sits on top of all the other artwork. To get it to sit nicely under the grunge brush border and the Play button, drag the Video Player from the top of the list, so that it sits underneath layer that has the Playbutton image.
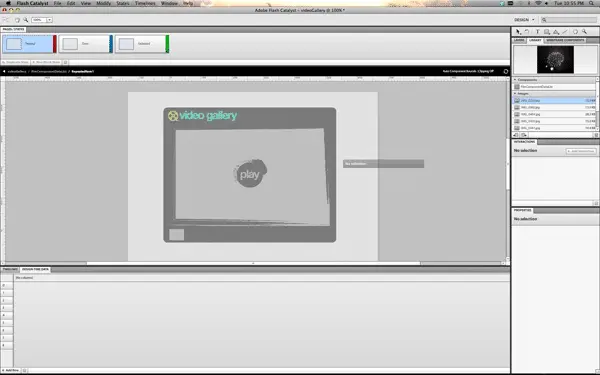
In the screenshot below, you can see we’ve successfully added our video player, removed the default controls, and arranged it at the correct layer position in our project.
Now that our main video player and thumbnails are set up, lets add some interaction.
Adding Thumbnail Interactions
We created thumbnails so the user could choose different video clips to play. In order to make this work, we need to add interactions so that clicking on a thumbnail changes the video clip. Interactions encompass all kinds of different behaviors, from mouse events, like clicking and mouse hovering, to behaviors that happen when video clips complete playback.
Select your thumbnail list. We’re going to add an interaction so that whenever a thumbnail is selected, the source property on the Video Player is set to the video clip corresponding to that thumbnail.
From the Interactions panel, choose + Add Interaction. Set up the interaction as follows:
First, choose the event that triggers the interaction. In this case, choose On Select.
Next, choose the response to that event: select Play Action Sequence.
Then select “When a specific item is selected,” which opens the Item dialog.
The Item number is the position of the thumbnail in your list. The leftmost thumbnail is 0, the next leftmost thumbnail is 1, etc.
Entering “0” in the Item dialog will play an action sequence whenever the first item in your Data List is selected. Now we just have to make the action sequence do what we want, which is change the video clip.
First, make sure that the Video Player is selected on the artboard. Next, from the Timelines panel in the lower left of Flash Catalyst workspace, under Action Sequences, select Data List On Select. Then select + Add Action > Set Property.
Now, in the Properties panel, under Common select Source, and select “Choose source…”
The Select Asset dialog opens, where you can select the source of the video clip to play. For the first thumbnail (item number 0), set the source property to your first video. For the second (item number 1), select the second, and so on. You will need to repeat this set of steps for each thumbnail in the list.
Adding Video Player Interactions
Now we need to add some interactivity to the Video Player. When “Play” is clicked, we want the “Play” component to fade away, the movie clip to play, and then the “Play” component to reappear when the movie clip has finished playing.
To make this happen, we must convert the “Play” image to a Button. Select the Play image on the artboard, and from the HUD, select Convert Artwork to Component > Button.
Later, we’ll define mouse interactions to our new button to play the movie clip.
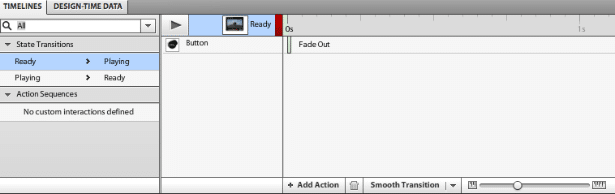
We also need to create another “Playing” state where the Play button isn’t visible. To do this, click Duplicate State in the States Panel. We’ve renamed the states to “Ready” and “Playing” by double clicking each state and giving it a custom name.
We don’t want the Play button to be visible in the “Playing” state, so select the “Playing” state and delete the Play button. This will only remove it from the currently selected state.
Now to add the interactivity that will make your movie clip play, select the Ready state and select the Play button. In the Interactions panel, click “Add interaction” to create a new Button interaction, and set it up as follows.
When the Play button is clicked, this interaction will cause the application to transition to the “Playing” state, but only if the application is currently in the Ready state.
Transitioning to the “Playing” state should also be the cue for the application to play the Movie clip. To make this happen, select the “Ready > Playing” state transition in the timeline.
We want to add an action to the Video Player, so select the Video Player as well. Choose Add Action > Video Control > Play.
Finally, we need to transition back to the Ready state once the movie clip finishes playing. With the Video Player still selected, in the Interactions panel click Add Interaction, and set it up as follows.
This will bring the application back to the Ready state once the movie clip finishes playing.
Running Your Project
To take your project for a test drive, choose File > Run Project (or Cmd/Ctl + Enter). You can do this often when creating your project to see how it behaves when it’s run. You can also publish a final version of your project by choosing File > Publish to SWF / AIR.
Conclusion
We hope this has given you a good introduction into one of the many things you can do with Flash Catalyst. You can imagine other enhancements that could be added to this video gallery, such as interactive tooltips when a user hovers over the video thumbnails, additional video controls, a full-screen mode, and so on. Try making your own video gallery artwork in Illustrator, Photoshop, or Fireworks, and follow these steps. Feel free to post comments/questions/suggestions below… we’ll be replying to them